How to cut an onion; slicing (the other way)


Again, start by taking half of a peeled onion

This time cut the root off but cutting 2-3 cm away from it.

Cut the root out of the onion

Then proceed to slice through the onion as such; horizontally as opposed to vertically. You’ll notice i’m resting the blade on my finger tip rather than my knuckles, this is only through cutting so many onions but i would advise to still rest the blade on your knuckles.

Cut in half for smaller strands of onion

This results in strand of onion that are straighter than when you cut it lengthwise. If you want shorter strands just cut the onion in half once lengthways before slicing into strips.

Small, straight(ish) strands of onion. Nice in a salad

I personally prefer this method of slicing as the onion cooks quicker because it’s in smaller pieces, I also prefer to cut it quite finely this way when putting raw onion in a salad/sandwich as I find it looks a bit nicer and it’s a lot more pleasant than chewing on a chunky lengthways slice of onion, to each their own though.

How to cut an onion; slicing (lengthways)

When slicing with a knife, rest the blade against your knuckles and WTF (Watch Those Fingers!)


Start by taking half of a peeled onion

When slicing, try to not let your fingers stick out and instead use your knuckles to rest the knife against.

This image has an empty alt attribute; its file name is ezgif-7-b73dc939c106.gif
Rest the knife on your knuckles when slicing

Use the knife to slice vertically down the onion, as you cut the onion the weight of the knife should push through it. Try to not cut too aggressively or fast until you’ve got the hang of it. As you slice the tip of the blade should stay in contact with the chopping board. Notice how the knife rests on my knuckle while slicing, keeping the fingertips safe.

This image has an empty alt attribute; its file name is vertical-onion-slice.gif
Slice vertically keeping the tip of the blade in contact with the chopping board, knife blade resting on knuckles

This will result in semi-circle strands of onion and is probably the most commonly used method of slicing an onion. For smaller, quarter circle strands just cut the onion on half through the root again.

This image has an empty alt attribute; its file name is vertically-cut-onion-slices.gif
Semi-circle slices of onion

Try to keep the spacing between slices the same so the onion is all roughly the same size (unless cutting for something that will get blitzed i.e soup, curry etc). This is so it all cooks at a similar rate and you don’t end up with raw bits of onion and overcooked bits of onion in the same dish.

How to peel an onion


How to peel an onion for use straight away (10-20 seconds)

1.Cut the top off the onion (not the root)

The top of the onion is the stringly top bits of skin, slice about 2-3cm down from here until you can remove it like a little hat.

1. Remove the top of the onion

2.Cut the onion in half

Put the onion flat side down and cut in half directly through the root.

2.Cut the onion in half

3.Remove the skin (peel)

Start in the corners and peel away down to the root, it should come away easily enough but the skins can stick sometimes. Either use a knife blade to get under it or if it’s being really stubborn just remove the next layer of onion.

3.Remove the skin from the onion

4. Tidy up

Half of a peeled onion

Check the later of skin around each half of the onion, if it looks like it’s dry or slightly brown/discoloured then peel it down to the next layer.

It should look nice and shiny.

How to peel an onion for later use (10-20 seconds)

1.Peel the onion

With a small knife make a small incision to the top of the onion through any loose skin and as you peel away move diagonally around the onion.

Be sure to not cut through or remove the root, it needs to stay in tact to keep the onion as fresh as possible

Peeling a whole onion with a knife

2. Tidy up

A whole onion, free from its skin

As above remove any unpleasant looking layers of onion and store in the fridge for upto 2 weeks or they look and/or smell nasty.

Now it’s peeled onto the slicey part.

How to prep/cut an onion like a pro, with plenty of gifs


Peel and chop, peel and chop..

The humble onion, bringing mankind to tears since it’s existence. Possibly one of my favourite, or at least most commonly used ingredients.

There is so much you can do with an onion, as i’ll show in later recipe posts, and knowing how to cut an onion properly can save a lot of time and stress. I would say on average i probably peel, slice,dice and cut up around 10-15 onions a day; for the last 15 years (!) so i guess i’ve got a bit of experience when it comes to prepping and advice on how to cut an onion properly.

How to cut an onion

I find that far too often i’ve been asked how to cut an onion, or i’ve witnessed someone trying to cut an onion when they clearly have no idea how to cut an onion (it can be quite painful to watch but then if you’ve never been taught, you don’t know!) so here is a complete guide on how to cut an onion.

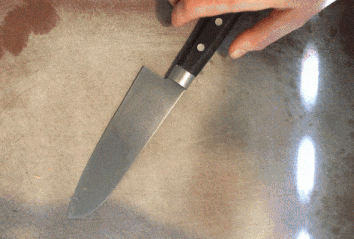
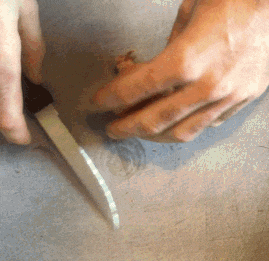
It goes without saying that a nice sharp knife is a big advantage when figuring out how to cut an onion (check this post on how to keep your knives in good check). Always WTF! (Watch Those Fingers!) because its not fun when you bleed on everything for 2 and a half hours.

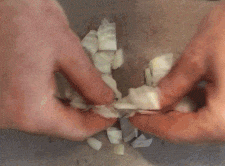
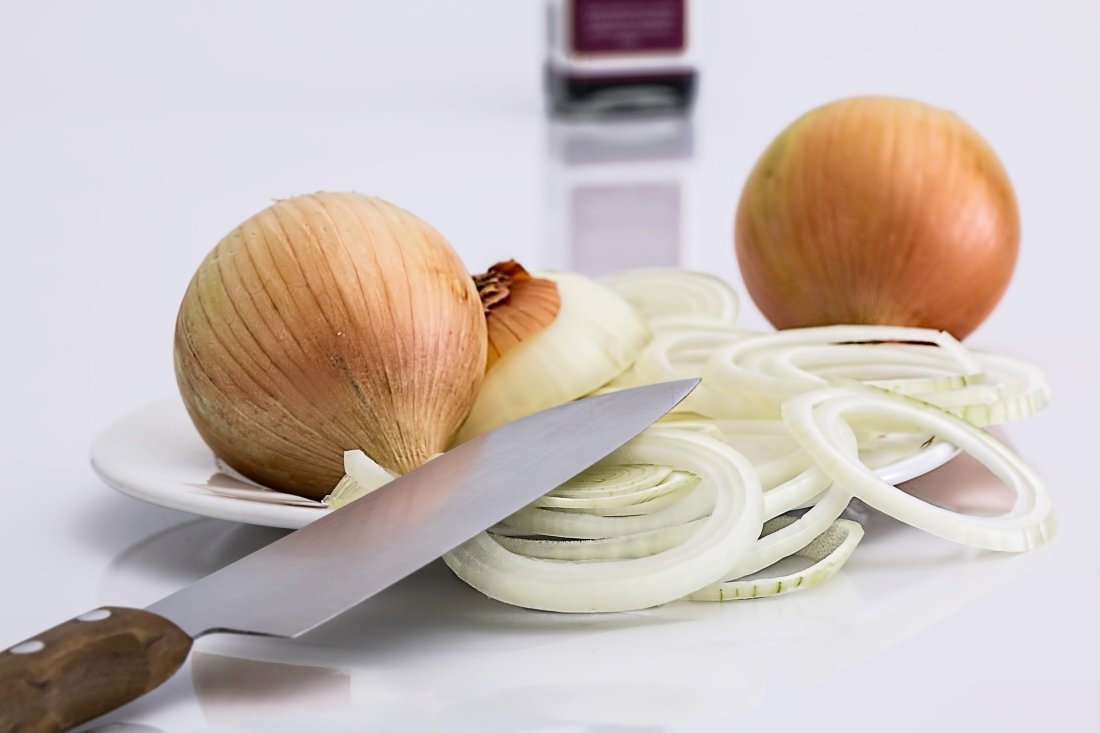
When it comes to onions remember the skins go nicely in a stock (if you’ve got one on the go) so just chuck them in the stockpot rather than the bin. In terms of prep there’s 5 (or 6) basic ways to prepare and cut an onion.

These consist of;

I’ll go into each one separately.

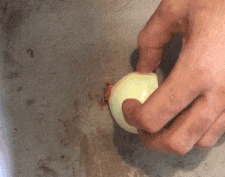
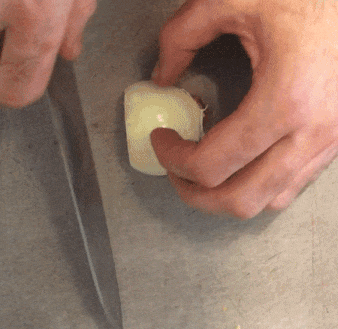
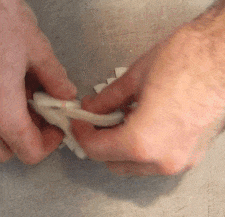
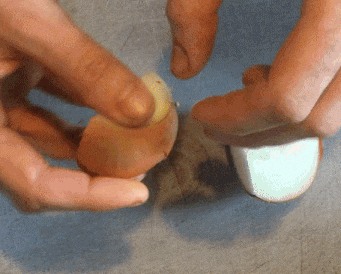
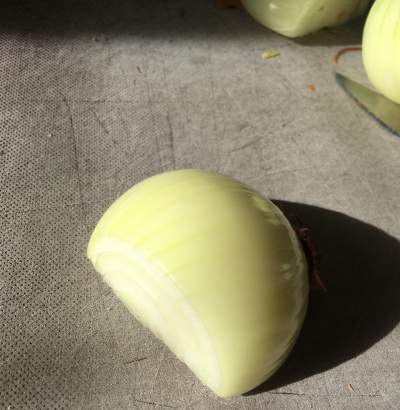
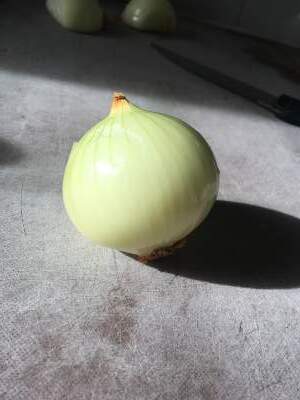
But first things first, you need to remove the aforementioned skin (stock it!) to get to the fleshy, oniony goodness.

How to peel an onion

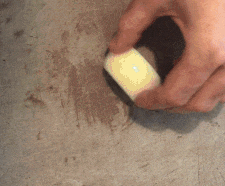
How to peel an onion? There are 2 ways (that i know of) that work best, one for when you need to use the onion straight away, and one for when you want the onion kept whole but with no skin (i.e for service or an event/party etc.).

When storing onion that are not cut up but have been peeled be sure to keep them in the fridge.

If you’ve heard or read anywhere than keeping sliced/diced/cut up onion in the fridge is dangerous then i can tell you now that i’ve been doing it my entire cooking career, and have been taught to do it by others, though it only lasts around 3 days i have never experienced any kind of problem (health or otherwise) storing cut up onion in the fridge, just keep it in an air tight container.

It can save you a lot of time (or what seems like a lot) if you just prep all your onion at onces (i.e a 2.5kg bag from the supermarket), thought just remember if you want to pre slice it to not do too much due to the shelf life.

Buying pre prepared vegetables, especially onions from supermarkets is more of a waste of your money than you think, to put it into perspective a bit, 1kg of sliced red onions from tesco comes in at £5.56/kg! You can get frozen sliced red onion at £2/kg but come on, frozen raw onions? We want nutrients from our food! Anyway to compare with the alternative, fresh, crisp, flavoursome red onions they cost a grand total of £1/kg.

I don’t know about you, but if you either look in the long term, or in terms of scaling up it’s a gigantic saving, for what is quite honestly 5 minutes work, possibly 10 if that.

Apologies for the rambling i just hate so see money wasted, especially on food. Eating well really doesn’t have to be expensive if you know how to get the most from your ingredients which i will (hopefully) help you realise!

On to the actual point i was trying to make, to peel an onion you need;

  • A knife, or something sharp
  • A chopping board, preferably not the floor

You can just do it with your hands, but assuming you want to slice or dice it after them i’m afraid they won’t work for that, and we have knives for a reason.

Sweet potato and spinach dhal (vegan)


My first attempt at a vegan curry recipe

I love Indian food. From what I know a good portion of (real) Indian food is made up of vegan recipes anyway.

(By real I mean the non-westernised version)

This is a satisfying vegan dhal recipe that won’t make you feel bloated (unless you get carried away eating it!)

Ingredients (serves 4)

  • 2 red onions
  • 1 large sweet potato
  • 500-900g fresh spinach (depending on how much you like spinach)
  • 6-7 cloves of garlic
  • About a 2 inch thumb of ginger
  • 200g red lentils
  • 600ml of veg stock or water
  • Salt and pepper to taste
  • Oil for frying
  • 2 tbsp ground cumin
  • 2 tbsp ground coriander
  • 1 tsp garam masala
  • 1 tsp turmeric
  • Chilli powder (optional, if you like some heat)

Equipment

  • Knife
  • Chopping board
  • Cooking pot
  • Hob to cook on
  • Either a fine cheese grater or an immersion blender (handheld blender). If you don’t have these a knife works fine so long as you can mince with a knife.
  • Veg peeler
  • Small pot

Prep (15-20 minutes)

  1. Finely dice the onion
  2. Peel and dice the sweet potato into about 2-3cm pieces
  3. Peel the garlic and ginger to make a garlic and ginger paste
  4. Make a curry paste by putting all the dry spices in a small pot with some salt, add a little water at a time, mixing until you gave a nice paste consistency, don’t worry if you add too much water and it’s a bit runny.
  5. If the spinach isn’t already washed then wash it.

Cooking (25-30 minutes)

  1. Heat some oil in a pan on a medium heat, add the onion and cook for about 5 minutes until soft.
  2. Add the sweet potato and cook for another couple of minutes.
  3. Add the curry paste you made from the dry spices. Mix well in the pan and cook for another few minutes.
  4. Add the lentils and mix well, then add the stock/water and turn the heat up, as it begins to boil turn the heat down low and leave to simmer for 10-20 minutes (it depends on how big you cut the sweet potato). Be sure to keep an eye on it so you don’t end up with a pot of oniony curry mash.
  5. When the sweet potato is about 2-3 minutes away from being ready add the spinach and stir through. Add salt/pepper to taste.
  6. Serve with rice, bread, salad etc.

Let me know what you think

And there it is, my first ever vegan curry recipe.

I thought it came out alright, and i’m usually my own worst critic!

Until next time!

Join 1,121 other subscribers

Sticky takeaway style sweet and sour sauce


No Chinese is complete without the sweet and sour sauce

A favourite of many over the nation, the Chinese takeaway.

I think the chicken balls and sweet and sour sauce are pretty much mandatory when you order a Chinese takeaway.

generic stock photo of Chinese food

This recipe is quick and easy and packs a punch of taste.

I’ll be completely honest i think the sauce in the above image may actually be chilli/sweet chilli looking at it, but that’s what i get for using stock photos.

Ingredients

  • Tomato ketchup
  • Light soy sauce (dark works but it makes a very dark sauce)
  • White wine vinegar (malt works fine but white wine vinegar tastes a little cleaner)
  • Sugar, caster or granulated
  • 1 tin of pineapple chunks/rings
  • Cornflour
  • Salt/pepper to taste, though it shouldn’t need it

Equipment

  • Saucepan
  • Knife (if you have pineapple rings instead of chunks)
  • Chopping board, if you need a knife
  • Wooden spoon

Method

  1. Open the tin of pineapple, KEEP THE JUICE!!! If you bought rings instead of chunks then cut them up.
  2. Put the pineapple and juice in a saucepan.
  3. Add ketchup depending on your palette, i usually use 2-3 tbsp.
  4. Add soy sauce again depending on your palette, i usually use 1-2 tbsp.
  5. Do the same with the white wine vinegar (i use 1-2 tbsp)
  6. Repeat with the sugar (around 50g)
  7. Put the pan on full heat until it comes up to the boil then turn the heat down low and let it simmer for 3-5 minutes.
  8. Whilst it’s simmering mix some cornflour with a little water to make a slurry. The more you use the thicker the sauce will be so it’s best to use a little bit at a time.
  9. If you don’t want the pineapple chunks in the sauce the strain though a sieve then return to the low heat.
  10. Add cornflour and mix until the sauce has thickened.
  11. Eat some chinese food.

A nice simple sauce

Badabing badaboom, sauce in 5 minutes great for dipping or drinking.

Did i say drinking, i meant uh…ok i like my sauces.

Chef on..

Join 1,121 other subscribers

How to sharpen a knife properly


(Or at least to the best of my knowledge )

Over the years I’ve seen many techniques for sharpening knives, from small minuscule grinds on every section of the blade to what can only be described as abusing knives.

If you didn’t already know the most common tool for sharpening a knife is called a steel, which funnily enough is a piece of strep used to grind the blade of a knife back to sharpness.

There’s literally thousand of types of steel (the metal) and a hell of a lot of types of steel for sharpening knives and I’m not here to list them, but this https://www.bladehq.com/cat–Steel-Types–332 is quite informative if you’d like to know.

Other than steels I’ve seen a few other things used before including other knife blades (best to use old unused ones if you have to resort to it) and sandpaper which my current head chef uses to great effect on serrated knives, starting with the coarse grit and getting finer.

Anyway, a sharp knife is pretty important to cook efficiently so onto the sharpening!

I don’t know if any of the terms I’m going to use are right, or if this is even the best way to sharpen a knife but it’s always worked well for me.

  1. Take a steel run it under a cold tap just to get it wet or run the knife under water instead.
  2. Put a fist in front of you like you’re doing a thumbs up, you want to hold the steel with your thumb on the top and the rest of your fingers supporting the grip with the steel facing downwards.
  3. Take the knife and try to get it at about a 20° angle to the steel.
  4. Now you want to do an up and down grinding motion, kind of circular for about 8 rotations, the knife blade shouldn’t leave the steel.
  5. Repeat the grinding on the other side of the blade, with the other side of the steel (right or left depending where you started)
  6. Then return to the original side of the blade you were working and place the heel of the knife (bit of the blade closest to your hand as you hold it) and run the blade down the steel like you’re slicing, as the blade travels down pull the knife back towards you so as the blade reaches the bottom of the steel the tip should be the last bit touching before contact is broken with the steel.
  7. Do the same thing again on the other side of the blade, the repeat one side after the other for about 7-8 downward slices against the steel.
  8. Wipe the steel and knife clean and get choppy choppy.

Safety first!

I know it goes without saying really, but I’ve worked in kitchens for 15 years now and I still make mistakes now and then, I personally find cuts a lot worse than burns as it makes it a lot harder to keep cooking when you’re bleeding everywhere!

If you’re using knives around other people then don’t let them distract you, either put the knife down to talk to them or don’t take focus off what you’re doing because that’s all it takes.

Another thing I’ve seen quite often is people cutting themselves up because they’re trying to be fancy with the steel and go 200 mph.

Not only can you wreck your fingers and forearms (trust me I’ve done it before 😂) but it’s not the best way to sharpen a knife either (fast), it’s more important to try and keep the blade at a constant angle rather than go as fast as you can just to be cool.

I will get round to uploading some pictures to assist with the technique, my steels are always at work.

Absolutely perfect, rich shortcrust pastry


Wonderfully crumbly but still holds its shape

Shortcrust dough

I love pastry, be it shortcrust or puff. I really feel sorry for people who are (genuinely) gluten intolerant, I know these days gluten free food is everywhere but let’s be honest, it’s not the same. Especially when it comes to shortcrust pastry, that said i do have a good recipe for a gluten free shortcrust pastry which i will post at a later date.

This recipe for shortcrust pastry is great for pies and tarts or quiches. And don’t worry! Pastry isn’t scary, (ok making puff pastry can be and not to mention pointless to make, but shortcrust pastry is fine), it really doesn’t take much time at all.

The main thing to remember is DON’T work the pastry too much when mixing, this will tighten the gluten and the shortcrust pastry will go hard and tough as opposed to soft and crumbly, as shortcrust should be.

Ingredients (makes about 800g of shortcrust pastry)

  • 500g plain flour
  • 250g butter or lard
  • 1 egg yolk
  • Salt
  • Water

Equipment

  • Mixing bowl
  • Scales
  • Hands
  • Cling film
  • Fridge
  • A sieve (not essential)

Prep (35+ minutes)

  1. Start by sifting the flour into the mixing bowl and add the butter, to make things easier you can cut the butter into cubes or just warm it in the microwave until it’s nice and soft (not liquid).
  2. Rub the flour and butter together with the salt, if you’re not sure what rubbing is it’s pretty self explanatory, it’s basically rubbing 😂 just pinch it all together with your fingertips until it looks sort of like golden breadcrumbs.
  3. Add the egg yolk and mix until the fully incorporated.
  4. Now start to add a bit of water at a time (don’t overdo it). This part is kind of down to intuition but keep adding water and mixing until you get a consistency you’re happy with, the less water you use the more crumbly the pastry will be, but make sure you adad enough to hold it enough to be able to roll out.
  5. When you’ve made the shortcrust dough and you’re happy with the consistency wrap it in cling film so it’s air tight.
  6. Put it in the fridge and leave it in there (chill) for at least 30 minutes to let the butter cool down. Use within 3 days, can be frozen for about 6 months.
  7. Go make some pie, or something that involves shortcrust pastry.

Cut the cost of pastry

While making this pastry works out at nearly equal to the price you’d pay for pre-made shortcrust from the shop, this contains actual butter whereas shop made uses margarine.

So onto costing, this pastry costs £1.10 to make 500g, but if you replace the butter with margarine it cuts the cost to as little as 40-50p/500g!

I personally prefer using real butter, but if you’re looking to save cash it can be handy and it still tastes delicious, just not quite as crumbly as it would be with butter.

Discover the Diversity of Basic ‘Slaw


The stuff that sounds like some kind of spot on your face; coleslaw (5 minutes)

A small pot of red cabbage coleslaw
A small portion of red cabbage ‘slaw

Coleslaw, it was only about 4/5 years ago I started eating this stuff and I fell in love with it.

Fresh, crunchy with a strong onion flavour, yah ples 😍

Ingredients (serves 4-8)

  • 1/4 of a white or red cabbage
  • 1 medium onion
  • 1 large carrot
  • Mayonnaise (home made or shop bought, will post a mayonnaise recipe later)
  • Salt & pepper

Equipment

  • Large bowl to mix everything
  • A sharp knife large enough to handle the cabbage or a mandolin slicer
  • Peeler
  • Chopping board
  • A fork comes in handy, or a wooden spoon
  • A cheese grater

Prep and cooking

  1. Slice the cabbage into thin strips, if you want crunchier coleslaw cut it a bit thicker.
  2. Slice the onion into thin strips, if you want a more prominent onion taste and again a crunchier coleslaw then cut it a bit thicker.
  3. Peel the carrot and grate with the cheese grater.
  4. Put everything in the bowl and add mayonnaise, how much is up to you I usually use about 7-8 tablespoons.
  5. Mix well and season with salt and pepper to taste.
  6. Eat, incorporate to another dish etc.

Cold sores and coleslaw

It turns out the two are (thankfully) in no way related. The term we use today (coleslaw) originated in the Netherlands in the 18th century from the Dutch saying ‘koolsa’ which translates to ‘cabbage salad’. When said with a Dutch accent the word ‘kool’ is pronounced ‘cole’.

Cold sores on the other hand are as it sounds, sores, usually around the mouth and you’ll be delighted to know that it’s a nicer term for oral herpes.

Yes oral herpes, we’ve probably all had it at some point and apparently67% of the worlds population have it at any given time, but don’t worry it’s not the same as genital herpes(!)

Mix up ya ‘slaw

So anyway enough about herpes, back to the food.

As I said I was never a great fan of coleslaw and I find it’s got quite a marmite opinion (love it or hate it) but after actually knocking some up myself and trying it I got completely hooked.

My favourite thing about it is it’s diversity which is something I usually look for in recipes / ingredients.

Keep you’re eyes out for updates to this recipe and I’ll start to document the hundreds (thousands?) of variations of coleslaw I’ve seen over the years or get involved with your own take in the comments.

When you start to diversify a bit you’ll see how it can become an a compliment to almost any dish, for example an apple slaw in pulled pork burgers, a celery slaw for a fish dish, I could go on all day but I’ll leave that part up-to you for now.

Join 1,121 other subscribers

How to make a McDonalds double cheeseburger even better than McDonald’s


McDonald’s double cheeseburger (5-10 minutes)

Ingredients (makes 1 double cheeseburger)

  • 100g mince beef (preferably 20% fat)
  • 1 burger bun (brioche is nicest)
  • 2 slices of burger cheese
  • 1/4 of a medium onion, finely diced
  • Pickled gherkin, sliced (optional)
  • Ketchup
  • American mustard
  • Salt and pepper (preferably sea salt)

Equipment

  • Non-stick or seasoned iron pan
  • Baking paper, about an a4 sheet
  • Fish slice / spatula
  • Hob to cook on
  • Microwave (not essential)

Prep and cooking

  1. Start by making the burgers, just 50g for each pattie (McDonald’s only use 45g!) roll each one into balls, like big meatballs, then fold the baking paper in half and put one of the balls the the centre of one half. Fold the paper back over and push down hard on the ball with the palm of your hand so it pushes down to make a burger Pattie, it should be quite thin. Season well with salt and pepper on both sides then repeat so you have 2.
  2. Get the pan nice and hot on a high heat and lightly toast the brioche bun, just put the flat (inside) parts of the bun in the hot pan and move it around with your fingers for 20-30 seconds, watch out it’s easy to burn it!
  3. When the bun is ready wipe the crumbs out of the pan and put it back on the heat until it start to smoke a little.
  4. If you used 20% fat mince you won’t need any oil in the pan, if you didn’t add a little splash (about 1/2 a tsp). The put the first burger in the pan and let it cook for 20-30 seconds. Then with the fish slice/spatula push down firmly on the top of the burger for about 3 seconds. It’ll sizzle a lot, that’s the fat reacting with the heat, the flip the burger and cook the other side for another 30 seconds or so, give it another like push on the top before taking out and placing on the bottom bun.
  5. Leave the pan on the heat and put a slice of cheese on top of the burger you just cooked, then cook the second burger the same as the first (unless you’re using a pan bug enough for 2 burgers). When it’s ready put it on top of the other burger and put the other slice of cheese on top.
  6. If you’re using gherkins put some slices on top of the top burger. The put an X of ketchup and an X of mustard on the top so they overlap, it should look a bit like a star.
  7. Put the diced onion on top of the sauces and put the top bun on, then put it in the microwave for 10-15 seconds.
  8. Ding! McDonald’s goodness in your own home.

The worlds most popular burger?

Dividing options worldwide, love it or hate it you can’t deny the addictive taste of a McDonald’s burger.

After making these homemade double cheeseburgers you might notice that the main taste you get from an actual McDonald’s burger is the onion, ketchup and mustard.

Do they use real meat? Who knows, I live in England and (currently) our food standards (should) ensure it is, but who fucking knows?

The cost of one of these homemade double cheeseburgers comes in at around 75p so about half the price of one you’d buy from the shop, these ones are actually served hot too!

So there you have it, culinary genius, or planet destroying clown food, the double cheeseburger.

Things you might not know about McDonald’s

  • They own Krispy Kreme
  • In America there are about 1.5 times more McDonald’s than hospitals
  • The yellow M is supposedly more recognised that the cross (religion)
  • In Sweden there is a ski through McDonald’s

Money grabbing bastards!